Tired of watering every day? The Chapin Bucket does it for you

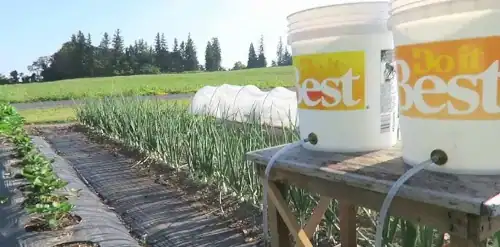
Back in the 1980s, an American engineer named Richard Chapin set out to help low-income communities irrigate their gardens in arid regions. His goal was clear: make it work without a pump and without any high-tech equipment. So he took a plastic bucket, drilled a hole in it, and used nothing but gravity to create a brand-new irrigation system. And it worked like a charm! A perfect example that true genius often lies in simplicity.
Today, the Chapin bucket is used in Africa, South America, Southeast Asia… and increasingly in permaculture gardens all over the world. Because it’s cheap, it’s super reliable, and it’s ultra simple.
In permaculture, the goal is never to waste energy
Letting nature do most of the work is 100% in the spirit of permaculture. And in that spirit, the Chapin bucket ticks all the boxes. It runs silently, completely on its own, and without electricity. Just gravity doing its job while you take a nap or enjoy a good book.
How does this 100% low-tech system work?
Without diving into boring technical details, here’s the simple version: the Chapin bucket is a drip irrigation system powered only by gravity. No solar panels. No gas. Just a slightly raised bucket, a perforated hose, and water going straight to the roots. The result? No waste. No headaches. It’s low-tech at its finest.

Why low-tech is the future (especially in the garden)
You don’t need a smart home app or a connected valve to water your carrots. With low-tech you save big money because there are no rising water bills and no electronics to replace. Plus, it’s robust since there are no moving parts to wear out and no risk of breakdowns. And it works anywhere in the world, whether you’re tending your own backyard garden or running a humanitarian vegetable plot in a dry zone. A Chapin bucket uses every drop of water efficiently, delivering it right at the roots without runoff or evaporation. In regions where water is scarce, an irrigation system this efficient can literally mean the difference between a failed harvest and a garden that feeds an entire family.
The magic of the Chapin bucket: gravity
Let’s get back to basics. Gravity is that invisible force that makes anything fall if nothing holds it up. Like liquids naturally flowing downward, an apple dropping from a tree, or your phone slipping from your hands. Legend has it Newton figured this out after getting hit on the head by an apple. True or not, that apple changed the world by leading to the understanding that everything with mass attracts everything else.
Centuries later, Einstein stirred things up even more by explaining that gravity isn’t really a force but rather a distortion of space-time. But let’s not go down that rabbit hole. The only thing to remember is: the higher you place your bucket, the stronger the downward push of the water.
And that’s exactly the principle behind the Chapin bucket. Place your bucket at 5 ft high and you’ll get about 2 psi of pressure. That’s more than enough to let water flow gently through small drippers, with no spraying and no excessive pressure. In the end, you get a slow and steady flow that does the job perfectly. So yes, it’s low-tech, but it’s also a fun nod to Newton and Einstein and even a cool way to teach kids a bit of physics in the garden.
Building a Chapin system to water 40 plants
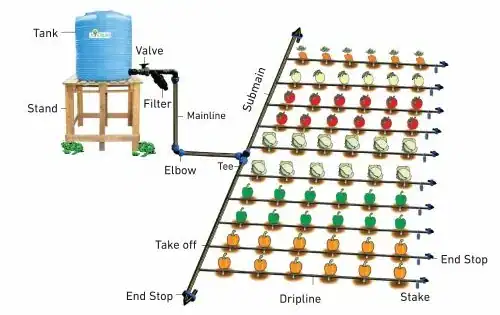
Want to water your garden without breaking a sweat? If the answer is yes, here’s a concrete example: a small gravity-fed irrigation setup that can water up to 40 plants with a single 5-gallon bucket, a few yards of tubing, and a bit of height. And nothing stops you from going bigger. With a larger reservoir, you can scale up the same Chapin system to cover several thousand square feet using exactly the same logic.

The setup consists of two 16 ft irrigation lines spaced 6.5 ft apart. Along each main line, a drip point is placed every 20 in, with each plant set 8 to 10 in away from the line. This offset allows for a plant on each side of the hose. That makes a total of 40 drippers: 20 per line set in double rows.
Materials needed
- A 5-gallon bucket, raised at least 5 ft high
- About 150 ft of flexible tubing (1/4 in or 5/16 in diameter), divided as follows:
- ~12 ft between the bucket and the irrigation lines (height + spacing)
- 32 ft for the two main lines (2 × 16 ft)
- 40 short tubes of 8 to 10 in each for the drippers, about 35 to 40 ft total
- → Always keep some extra for bends, overlaps, and adjustments
- 40 low-pressure drippers
- 38 cross connectors (to supply two drippers at each point)
- 2 T connectors (to close off each main line)
Tools and supplies
- A drill with a conical bit to make a clean hole in the bucket
- Sealant (or silicone) to prevent leaks at the base
- A box cutter or sharp utility knife
- The official dripper punch tool (mandatory for a proper seal)
- A solid old stepladder or stable structure to safely raise the bucket
- Optional: a filter at the bucket base if you use rainwater or unfiltered water
Assembly steps
- Drill a hole near the bottom of the bucket and install a watertight fitting (bulkhead or faucet). Make sure it doesn’t leak.
- Run the tubing from the bucket to the garden, then split it into two main 16 ft lines, spaced 6.5 ft apart.
- Every 20 in, insert a cross connector into the main line.
- From each cross connector, attach two side branches 8 to 10 in long, one on each side, with a dripper aimed at the plant base.
- Close each line with a T connector and a dripper at each end.
- Place the bucket on a stand at least 5 ft high, more if possible.
- Finally, just fill the bucket and test it out.
Pro tips so your setup doesn’t fail
Let’s be honest. What you’ve read so far is already light-years ahead of the half-baked DIY hacks you’ll find on YouTube or in churned-out articles written by people who’ve never grown anything beyond mold on an old sandwich. You could stop here and copy a sketch that will half-work for a few days. But if you want a reliable, solid system that runs from spring to fall without leaks or clogs, then keep reading. These are field-tested tips, and they make all the difference between a failed hack job and a truly functional setup.
Hidden Content
A very important part of this how-to guide is not visible. Only members can access the full content. Registration is 100% free and takes just a few seconds. Become a member and enjoy all the services of the site. If you are already registered but still see this message, make sure you are logged in to unlock full access.
With our pro tips, your Chapin system will really work
That’s it! If you’ve read this entire guide, you don’t just know what a Chapin bucket is — you now know how to build one that will actually be useful. And you’ll get to enjoy a fully functional irrigation system that keeps your garden thriving while you relax.
If this guide helped you, consider buying me a coffee on Buy Me a Coffee so I can recharge before the next tutorial. A huge thanks also for sharing this contribution widely on your networks, and happy watering! And if you’d like to discuss this technique together, feel free to use the comments section below or join the forum.

No chatbot here pretending to know it all. Just real, friendly humans happy to help. Feel free to jump into NovaFlow if you have questions or just want to share your thoughts on this guide.